Hey, guys. So now we're going to start talking about Kirchhoff's loop rule, which is going to be massively important when you start solving more complicated circuits. Now we're going to build this up a little bit at a time over a few videos, and I'm going to take it a little bit slow because I want you to have a strong foundation so that when you get to problem-solving, it can be a breeze. This can be a little hairy, so we're going to build it up a little bit at a time. Let's check it out. Alright. So far, we've dealt only with resist, with circuits that had a single source, like a single battery. But now we're going to start to get into circuits with multiple batteries. So, we're going to need new tools. And what we mean by new tools is new rules and new equations.
The new rule we're going to use is Kirchhoff's loop rule and it states that the sum of all voltages in a loop is simply 0. It's conceptually very simple, but it's pretty tricky to write equations. One way to summarize this entire thing here is just to say that the sum of all voltages in a loop is 0. This rule is also called Kirchhoff's or Kirchhoff's voltage law. Voltage law because you're going to be going in a loop adding voltages, or voltage law because you're adding voltages. Whatever you want to call it, I want to point out that this rule actually works for any circuit. So, we could have used this to solve some circuits earlier, but it's going to be especially useful when you have multiple sources. It's too hard for the easy stuff, but it's necessary for the hard stuff.
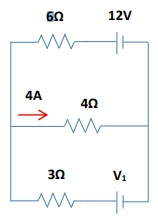
So, what we're going to do is for each loop in a circuit, we're going to write one loop equation. For example, if you look here, these wires and all these elements form one loop, so we're going to get one loop equation. What we're going to focus on now is how to write this loop equation. What the equations will do is that we'll either add or subtract voltages of the batteries and the resistors. The voltage of the battery here. Now, the voltage of the resistor is simply times r. times r. is the current, and r is the resistance. And this comes from Ohm's law, v equals r.
V = I R .That's the voltage of the resistor is going to be . So, for example, I have a current here. So it's going everywhere here. And what we're going to do is we're going to write the sum of all voltages which, by the way, is going to equal 0. I'm going to write all the voltages here. I'm going to list all the voltages. So, I'm going to pick a point here. Let's say we're going to start here, and we're going to make a loop all the way around this circuit here. And I can go in any direction. I can go this way or I can go the other way. I'm going to go this way because it's the way that the current's going. So, we're just going to go with the current. And so the first element that you run through here is . So what you're going to do is you're going to write . And then when you get to , you're going to just write plus. And then you're going to keep going here. Imagine you're just moving along. You're going to cross this. So you're going to write plus the current, which is everywhere, . And then you're going to get over here, and you're going to write plus. Now, notice here that I said that the equation is going to add or subtract voltages. And here I just added all of them, which is actually wrong. These voltages are going to be either adding or subtracting, and I don't know yet. We don't know yet which one. And that's what we're going to talk about next, but I just want to give you a basic idea first before we start, that you're going to be adding these things and then setting them equal to 0. Now, are they going to be adding or subtracting is what we're going to talk about now.
They're going to be adding or subtracting depending on two things. On the direction of the current and on the direction of the loop. So direction of the current in this case was clockwise, and the direction of the loop was also clockwise. Just to show you what I mean by direction of current and direction of the loop. So the first thing we're going to do, and we have to do this before we start writing the equation, is we're going to use a direction of current to put positive and negative signs on the ends of each resistor. So let me show you what I mean. So here for a resistor, the positive end is where the current enters the resistor. So look at this diagram down here. The current's going this way. It enters the resistor here. So I'm going to put a little positive on this side of the resistor, and therefore, the negative goes on the other side. The current keeps going keeps going, and the current enters this resistor right here. So we put a positive here and make this negative bigger and a negative here. For batteries, the positive end is always going to be, the positive terminal. So it actually does not depend on the direction of the current. So the positive terminal is a longer one here. So I'm just going to put a positive on this side, so the other side's a negative. And I'm going to put a positive on this side, and this other side's a negative. So the first thing we do is we put these signs everywhere.
Now what we're going to do is we're going to choose the direction of the loop. Remember I mentioned when we started going around the circuit up there that I could have gone clockwise or counterclockwise. We're going to choose a direction, and I'm going to choose to loop this way. I'm going to write loop here. And all that means is the sequence in which you're going to add things. Right? So we're going to start here, and we're going to go this way. So the first element I'm going to cross is , then I'm going to cross, and so and so forth. And it says here, when crossing elements in this direction, this is the direction of the loop, you're going to add the voltage if you crossed that element going from negative to positive. Once you get this, it's going to be super simple, but I want to move slowly here. So let's just see here. If you're going from negative to positive. So if you follow the current here, you're going from positive to negative. That's the opposite here. Right? So if you add when you're going from negative to positive, this means you will subtract subtract if you're going from positive to negative. So this here, the voltage of that will be subtracted. So I'm going to write the sum of voltages is negative . Now let's go to the next element. I'm going to keep going here, and I'm going from positive to negative again. So when I cross this battery, I'm going from positive to negative. So I'm going to subtract that voltage there. Now let's keep going. Now I'm going to go again from positive to negative. So because I'm going into the negative, I'm going to subtract the voltage of, and remember the voltage of every resistor is always. So this is going to be. And finally, I get to this last element here, and I'm going to cross it. And when I cross it, right, imagine your sort of charge is going through. I'm going from negative to positive, finally going to a positive. So this voltage will be a positive voltage when I list it here, . And this entire thing has to be set to 0. If you want to make this a little neater, I can move some things around. Notice that everyone's negative except. So I can move everything to the other side, and it's going to look like this. equals. So that's the loop equation for this loop.
What I want to do now is I want to write a loop equation for the same circuit above, which I drew down here. But now we want to go in the opposite direction of the loop. Let's go in the opposite direction of the loop. So I'm going to put my little starting point here, but now we're going to go this way. What this means is that you're first going to encounter this guy and jump through it. Now remember the first thing you do is you put these signs everywhere. These pluses and minuses. The battery is the easiest one to do because the big one is always plus, this is always minus, always plus, always minus. The resistor, the plus goes where the current enters the resistor. This is one of the most important things to remember. Where the current enters the resistor. So the current hasn't changed direction. So it enters here, so positive to negative, and the current keeps going to here, and then it enters here positive to negative. Now we're ready to start going around the loop. Sum of all voltages in this loop, we're going to start here. So the first element you jump across is the, and it's going from positive to negative. So it's going to be negative. And then you keep going, you jumped from negative to positive. So it's going to be positive voltage of the. Voltage of a resistor is, so. And then we're going to keep going here, and we're going to jump from negative to positive. So it's going to be positive voltage of that battery, which is . And lastly, we're going to get here and jump from negative to positive. And because I'm going into a positive, it's going to be positive, the voltage of of which is. Don't forget at the end to set this entire thing to 0. And you end up with this.
Now if I want to clean this up a little bit, I can move the only guy that's negative here is . So I can move to the other side, and I get that equals. Actually, I'm going to write on the left. I'm going to write. Imagine that all these guys go to the other side, and then you get rid of all the negatives. So you get something like this after a little bit of moving around. And the reason I wanted to put it here is because I wanted to show you, this is the final equation, that this equation is exactly identical to this equation. And the point here that you absolutely have to remember is that the direction of the loop does not matter. The direction of the loop does not matter in that it's going to give you the same equation whether you go clockwise or counterclockwise. So just pick one. Cool. So, this is a quick introduction of how you write these loop equations. We're going to do a little bit more to build up the concept so that you are a beast at this. Let's keep going.


