Reconnect With Your Inner Child Through Friendship Bracelets

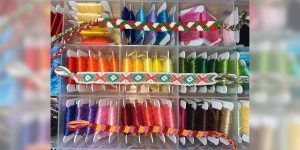
Being stuck inside during the winter sometimes sends me looking for some unplugged activities. Thinking back to my summer as a camp counselor, the “it” way to pass the time was to make friendship bracelets! Whether you’re a seasoned bracelet maker or just getting started, I want to welcome you to the color world of friendship bracelets!
I’ve been making friendship bracelets for years and I can tell you it takes a lot of practice! The foundation of friendship bracelets is very simple: a forward knot and a backwards knot. If you know how to do these 2 knots, you can read what are called “alpha patterns” and make any design!
How To Do a Forward and Backward Knot
If you know what the number “4” looks like, you’re already 99% of the way there!
To make a forward knot: simply grab on to one string in your left hand - let’s call this String A - and the string to the right of it in your right hand - let’s call this String B. String A will form a “4” over String B. The end of String A will cross under String B to form the knot, and then you pull upwards to tighten.
To make a backward knot: simply make (you guessed it!) a backwards “4” where String B crosses over String A, the end of String B crossed under String A, and pull.
How To Read an Alpha Pattern
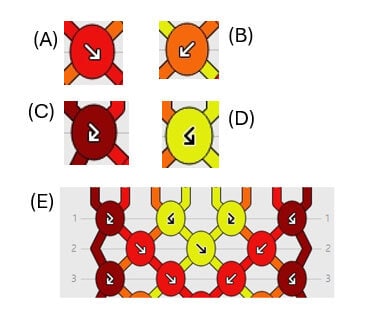
An Alpha pattern is essentially a visual representation of a bracelet design arranged in a grid format with arrows corresponding to either the forwards or backwards knot. There are 4 types of arrows to be aware of.

In the image above, (A) = forward knot, (B) = backward knot, (C) = forwards-backwards knot; and (D) = backwards-forwards knot. (E) = an example of an Alpha Pattern.
Keep in mind, for forward knots (A) and backward knots (B), each knot should be completed twice. This means that when you see an (A) or (B) arrow, you are doing 2 forward knots or 2 backward knots with the corresponding strings. When you see a (C) or (D) arrow, those already have 2 knots built in!
There are often colors to help guide you as you see above. The color of the circle, in this case red, orange, brown, and yellow, helps remind you what color is creating your 4 knots.
Getting your String Ready.
Now that we know how to read an alpha pattern, let’s grab some string! For the sake of our example, choose any 4 colors you like. To measure your string, hold the end in one hand and measure to the length of your wingspan. Do this for each color so you have 4 long strings. Hold all your strings together in the middle and fold them in half. Now just tie a knot in the end to create a loop and you’re ready to begin!
Using An Alpha Pattern.
In the image above (E) = an example of what the first 3 lines of an alpha pattern could look like. This example comes from Braceletbook.com, one of my favorite places to find alpha patterns!
Line 1 Guide:
- I will take my first 2 strings – brown and red – and do a forwards-backwards knot (C). To help me, the circle is brown so I know that I am making my “4” with the brown string. After completing my knots, I can set these strings aside for the rest of the row and move on to the next strings in the row.
- I will take my 3rd and 4th strings – orange and yellow – and do a backwards-forwards knot (D) with the yellow string since that is the direction of the arrows and the circle is yellow.
- I will take my 5rd and 6th strings – yellow and orange – and do a forwards-backwards (C) knot with the yellow.
- Finally, I will take my 7rd and 8th strings – red and brown – and do a backwards-forwards knot (D) with the brown string.
Line 2 Guide:
- It gets tricky here! We can see there is no knot connected to the brown string on the lefthand side. That is okay! This just means we will not complete any knot with that string for this row, and we can skip it.
- I will take my 2nd and 3rd strings – red and orange – and do a forward knot (A).
- I will take my 4th and 5th strings – both yellow – and do a forward knot (A).
- I will take my 6th and 7th strings – orange and red – and do a backward knot (B).
- Again, there is no circle connected to my 8th string, so I have completed this row!
Line 3 Guide:
- I will take my first 2 strings and do a forwards-backward knot (C).
- I will take my next 2 strings and do a forward knot (A).
- I will take my next 2 strings and do a backward knot (B).
- I will take my last 2 strings and do a backwards-forwards knot (D).
This above was just an example for some practice, but there are thousands of alpha patterns to choose from, so many designs, and infinite color variations! Friendship bracelets are the perfect customizable winter activity for taking a break from studying, or just hanging out with friends, plus they make great conversation starters or gifts! Happy crafting!
Do you have a compelling story or student success tips you’d like to see published on the Pearson Students blog? If you are a college student and interested in writing for us – click here to pitch your idea and get started!


