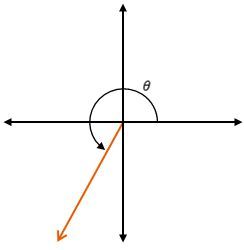
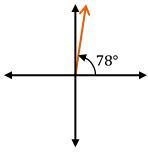
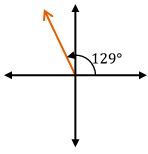
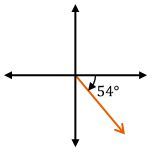
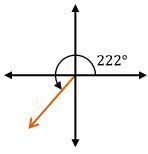
Hey, everyone. So in a previous video where we discussed the basics of triangles, we said one way to classify a triangle was based on its angle, and an angle is just where two of the sides of a triangle will meet. Well, a lot of times when we're going to be working with angles, we'll need to work with them not in a shape or floating around in space, but instead on an x and y coordinate system like this. Angles are one of the most important things that you'll need, not just for this course, but you'll also be using them regularly in other math courses. I want to make sure you have a great understanding of them. So I'm going to introduce you to angles, and I'll show you how to draw them. There are some conceptual things you'll need to know, and then we'll do some examples together. Let's get started here. So the first thing I want to talk about is the definition of an angle. Your textbooks won't have a great definition for this, but it's basically just the gap or the space that you create between two line segments or sides of a triangle. A lot of times when we work on the xy-coordinate system, we don't even care about that third side of the triangle, but the angle is really just sort of this gap that you make here in between these two line segments. Alright? Now, the bigger the gap, the bigger the angle. And we came up with a number system for this a long time ago, like thousands of years ago, where basically you measure in degrees from 0 all the way to 360 as you go around the xy-coordinate system. The ancient Babylonians a long time ago decided that the x-axis over here would be 0, and then as you go around, the angle gets bigger. If you go around a full circle over here, you've gone a full 360 degrees. That's probably another concept you're familiar with, which actually cuts up our x and y axis into increments of 90. Right? We'll go a quarter of the circle, that's 90. Another quarter of the circle, that's another 90, so it'd be 180. Another quarter of the circle, this would be 270. And then all the way back around would be 360, and then you would just start all the way over again. Alright? So then, what would something like 60 degrees look like? Let's just get right into our first example. If these things are 90, 180, and 270, what would 60 degrees look like? Well, first of all, how do you even draw what an angle is? How do I know which of the sides to draw? Can I draw an angle that kind of looks like this with those two sides?
But what we do is a long time ago, we decided that the way we're going to draw angles is from the initial side. The initial side is going to be along the positive x-axis. So in other words, it's going to be this side over here, and you're going to draw from that to the terminal side. The terminal side is usually going to be the one that's not on the x-axis. Alright? So that is the terminal side. Whenever you have an angle that's drawn like this, and all of your angles are going to be drawn like this, your textbooks refer to that as an angle drawn in standard position. In fact, most of the time, you're not even going to see this initial side. You'll just see something that looks like this. That's how your angles will be shown. Alright? So that's how you draw an angle. So then, how do you get to 60 degrees? Well, basically, you can use your axis as guides for this. Right? If I have a sort of angle that sweeps out like this and I go all the way around, whoops, an angle that looks like this, that would be 90 degrees. Right? So I want something that's going to be a little bit less than 90. Alright? If I draw something that looks halfway between 0 and 90, that's going to be 45 degrees halfway between 0 and 90. So I need something that looks a little bit sort of more steep than that. In fact, actually going to look something like exactly what I've drawn over here with this line. If you drew it exactly like this, this is about what 60 degrees is going to look like. Now, again, this has to you know, it doesn't have to be perfect because it's just a sketch, but I have a little protractor here that kinda helps me sort of gauge these angles. And if you draw this, this is going to be about, like, 50 degrees, which is close enough. Right? That's what I've got there. Alright. So that's how you draw 60 degrees. Let's move on to the next one.
The next one I'm going to draw in purple over here. How do you draw a 150 degrees? Well, again, the initial side is going to be the same. It's always going to be along that positive x-axis. And what I'm going to do here is I'm going to start to draw a little angle that goes all the way around in this direction. Alright? So notice here how this goes from 0 to 90. A 150 is going to be a little bit more than 90. But if you draw all the way to the left, that's going to be a 180, which is going to be too much. So it's going to have to be somewhere here in this quadrant, and it's going to be close to 180, not exactly close to 90. So it's going to look something like this. Alright? If you measure this angle all the way from the positive x-axis like this, that's going to be about 150 degrees. Alright? So we've got those two that are done. So pretty straightforward there. Now, one of the things you might have noticed here is that both of these examples have been positive angles, but we've always been drawing them up like this from the positive x-axis in the counterclockwise direction. This is just a convention that we came up with a long time ago, which is that we're going to draw positive angles in the counterclockwise direction against the direction of the clock. That just means that if you have a negative angle, like, for example, negative 60 degrees, you're going to go the other way. You're going to draw those in the clockwise direction. Alright? So, how would I draw negative 60? Well, positive 60 would be if I went up from 0 like this and drew an angle like that. Negative 60 would be in the opposite direction. And I have to go down like this in this direction, and if I go clockwise down from 0, that's going to be negative 60 degrees. That's one way I like to remember this. Positive angles go up from 0, Clockwise negative angles will go down from 0. That's one way I like to remember this. That's really all there is to it. That's how you sketch angles in standard position. Alright? So one last thing I want to mention here is you may be asked to sort of classify types of angles, and it's actually very similar to how we did this for triangles. So, the three words we use for this are going to be acute, obtuse, and right, exactly like what we use for triangles. And, basically, those things have to do with what they are relative to 90. Acute angles are going to be less than 90 degrees. So for example, this is an acute angle, that example a that we work with. Example b, which is 150 degrees, that's going to be something that's bigger than 90, so that's an obtuse angle. And a right angle is exactly equal to 90 degrees. Alright? This is something really quick that you might be asked for. That's it for this one, folks. Thanks for watching, and let me know if you have any questions.